It’s been a while since I’ve posted an update, blog, recipe, other fun-filled reads… BUT, this.
THIS.
Why am I choosing to share this video out of the hundreds of other videos, studies, essays, and research I’ve come across proving the message that is being put across? It’s pretty simple, really.
It’s short enough to get and keep your attention for the whole thing.
It’s JAM-PACKED with legit, clinical studies and information proving the point.
It relates to a common struggle MANY OF YOU have expressed, and are unsure why.
If you watch one 5-minute video this week, or this year… It better be this one. I’ll admit, that may even be including my own videos for you guys! There is a lot explained in this short video that can be a huge eye-opener to many people (which, in turn, will help you MAKE and STICK to your healthy choices):
What do you think? Does any of thing ring true to you? If you’ve gotten my Nutritional Cheat Sheet, you will see my notes regarding single foods that are both high in fat and carbohydrates (think ice cream, fried anything – especially sweets, most anything sugary and processed, even peanut butter, to name a few).
Hint: As you know by watching the above video, you want to steer clear of such apparent deliciousness!
Let me know what you think about this beneficial lil’ video of education in the comments below; will this effect your food choices from here on out? Have you experienced any of the side-effects mentioned when it comes to dopamine or satisfaction? Discuss!
Depending on the type of protein powder (for the sake of simplicity, I will refer to the two more common comparisons: whey and plant-based), there is little difference when it comes to actual preparation and ways to enjoy.
Compared to whey, plant-based protein (like my favorite: RawFusion), tends to act more like a ‘flour’ when mixed or baked into different things. It is a bit thicker, slightly harder to blend, and can even be made into a pudding quite easily (similar to casein protein for anyone familiar with Casein Fluff). Whey, however (especially whey isolate), tends to become more gummy and liquid-like and would not suffice in a pudding-type treat. Due to this, it does blend into liquids or other foods, like yogurt, much faster and easier.
So in the case of consistency, plant-based proteins = thicker like flour; whey proteins = easier to blend into liquid. Regardless, both are great for blended smoothies. And since most clients I have worked with are in need of a convenient way to use protein powder as opposed to becoming the next Master-of-Creative-Culinary-Uses-For-Protein (guilty, as proven by the video at the bottom of this post), I will share a couple of my favorite go-to protein smoothie ideas that are easy, delicious, and nutritionally-sound.
These are great any time of day: breakfast, an hour or so before your workout, after your workout, or literally any time. Sure, there are certain benefits timing-wise if you want to get more detailed with the science of nutrient absorption versus activity and a whole slew of other metabolic factors, but what ultimately matters is simply getting into the routine of having additional protein and feeding your body favorable nutrients in general. Trust me. Do not over-complicate things, especially with new routines. Focus on the grand scheme rather than minute details. Have your shake or smoothie where it fits best for you and your schedule.
Remember: it is best to start with small and simple habits!
Protein Mocha Frappuccino
8-10 oz. unsweetened almond or coconut milk
1 scoop Protein Powder of choice (or 2 for active men) *I use RawFusion
1 Tbsp. Instant Coffee Granules
1 Tbsp. Unsweetened Cocoa Powder *omit if you’re using Chocolate-Flavored Protein
1 Handful of Ice
1 Tbsp. Chia Seeds OR 2 Tbsp. Ground Flaxseed
Optional: 1 tsp. vanilla extract, or any extract of choice! Coconut, Mint, Orange, Banana.. tons of fun flavors out there! Be creative!
Blend in blender and enjoy!
Fruity Protein Smoothie
8-10 oz. unsweetened almond or coconut milk
1 scoop Protein Powder of choice (or 2 for active men) *I use RawFusion Vanilla
Optional: 1 tsp. vanilla extract, or any extract of choice! Coconut, Orange, Banana… get creative!
Blend in blender, sprinkle some cinnamon on top, and enjoy!
*For those seeking a trusty, inexpensive little blender, I always suggest this Hamilton Beach Single Serving Blender with Travel Lid. It is easy to find (sold at Wal-Mart or Amazon.com for $12-14), blends your shake smoothly, lasts FOREVER (I’ve had mine for over 6 years, plus check out these reviews), and is great to keep at work and/or at home.
The great thing about smoothies is that you CAN very easily adjust and get creative according to your taste! Make it aVeggie Smoothieby adding in some cucumbers, celery, spinach… Make it an Apple Pie Smoothie by using vanilla protein, cinnamon, a chopped apple (or even organic apple sauce), and some walnuts… Make a Pumpkin Pie Smoothie by using pumpkin puree, vanilla protein, cinnamon, ginger, nutmeg, and some pecans… Don’t be scared to try new things! You’ll be surprised at some of the deliciousness you come up with.
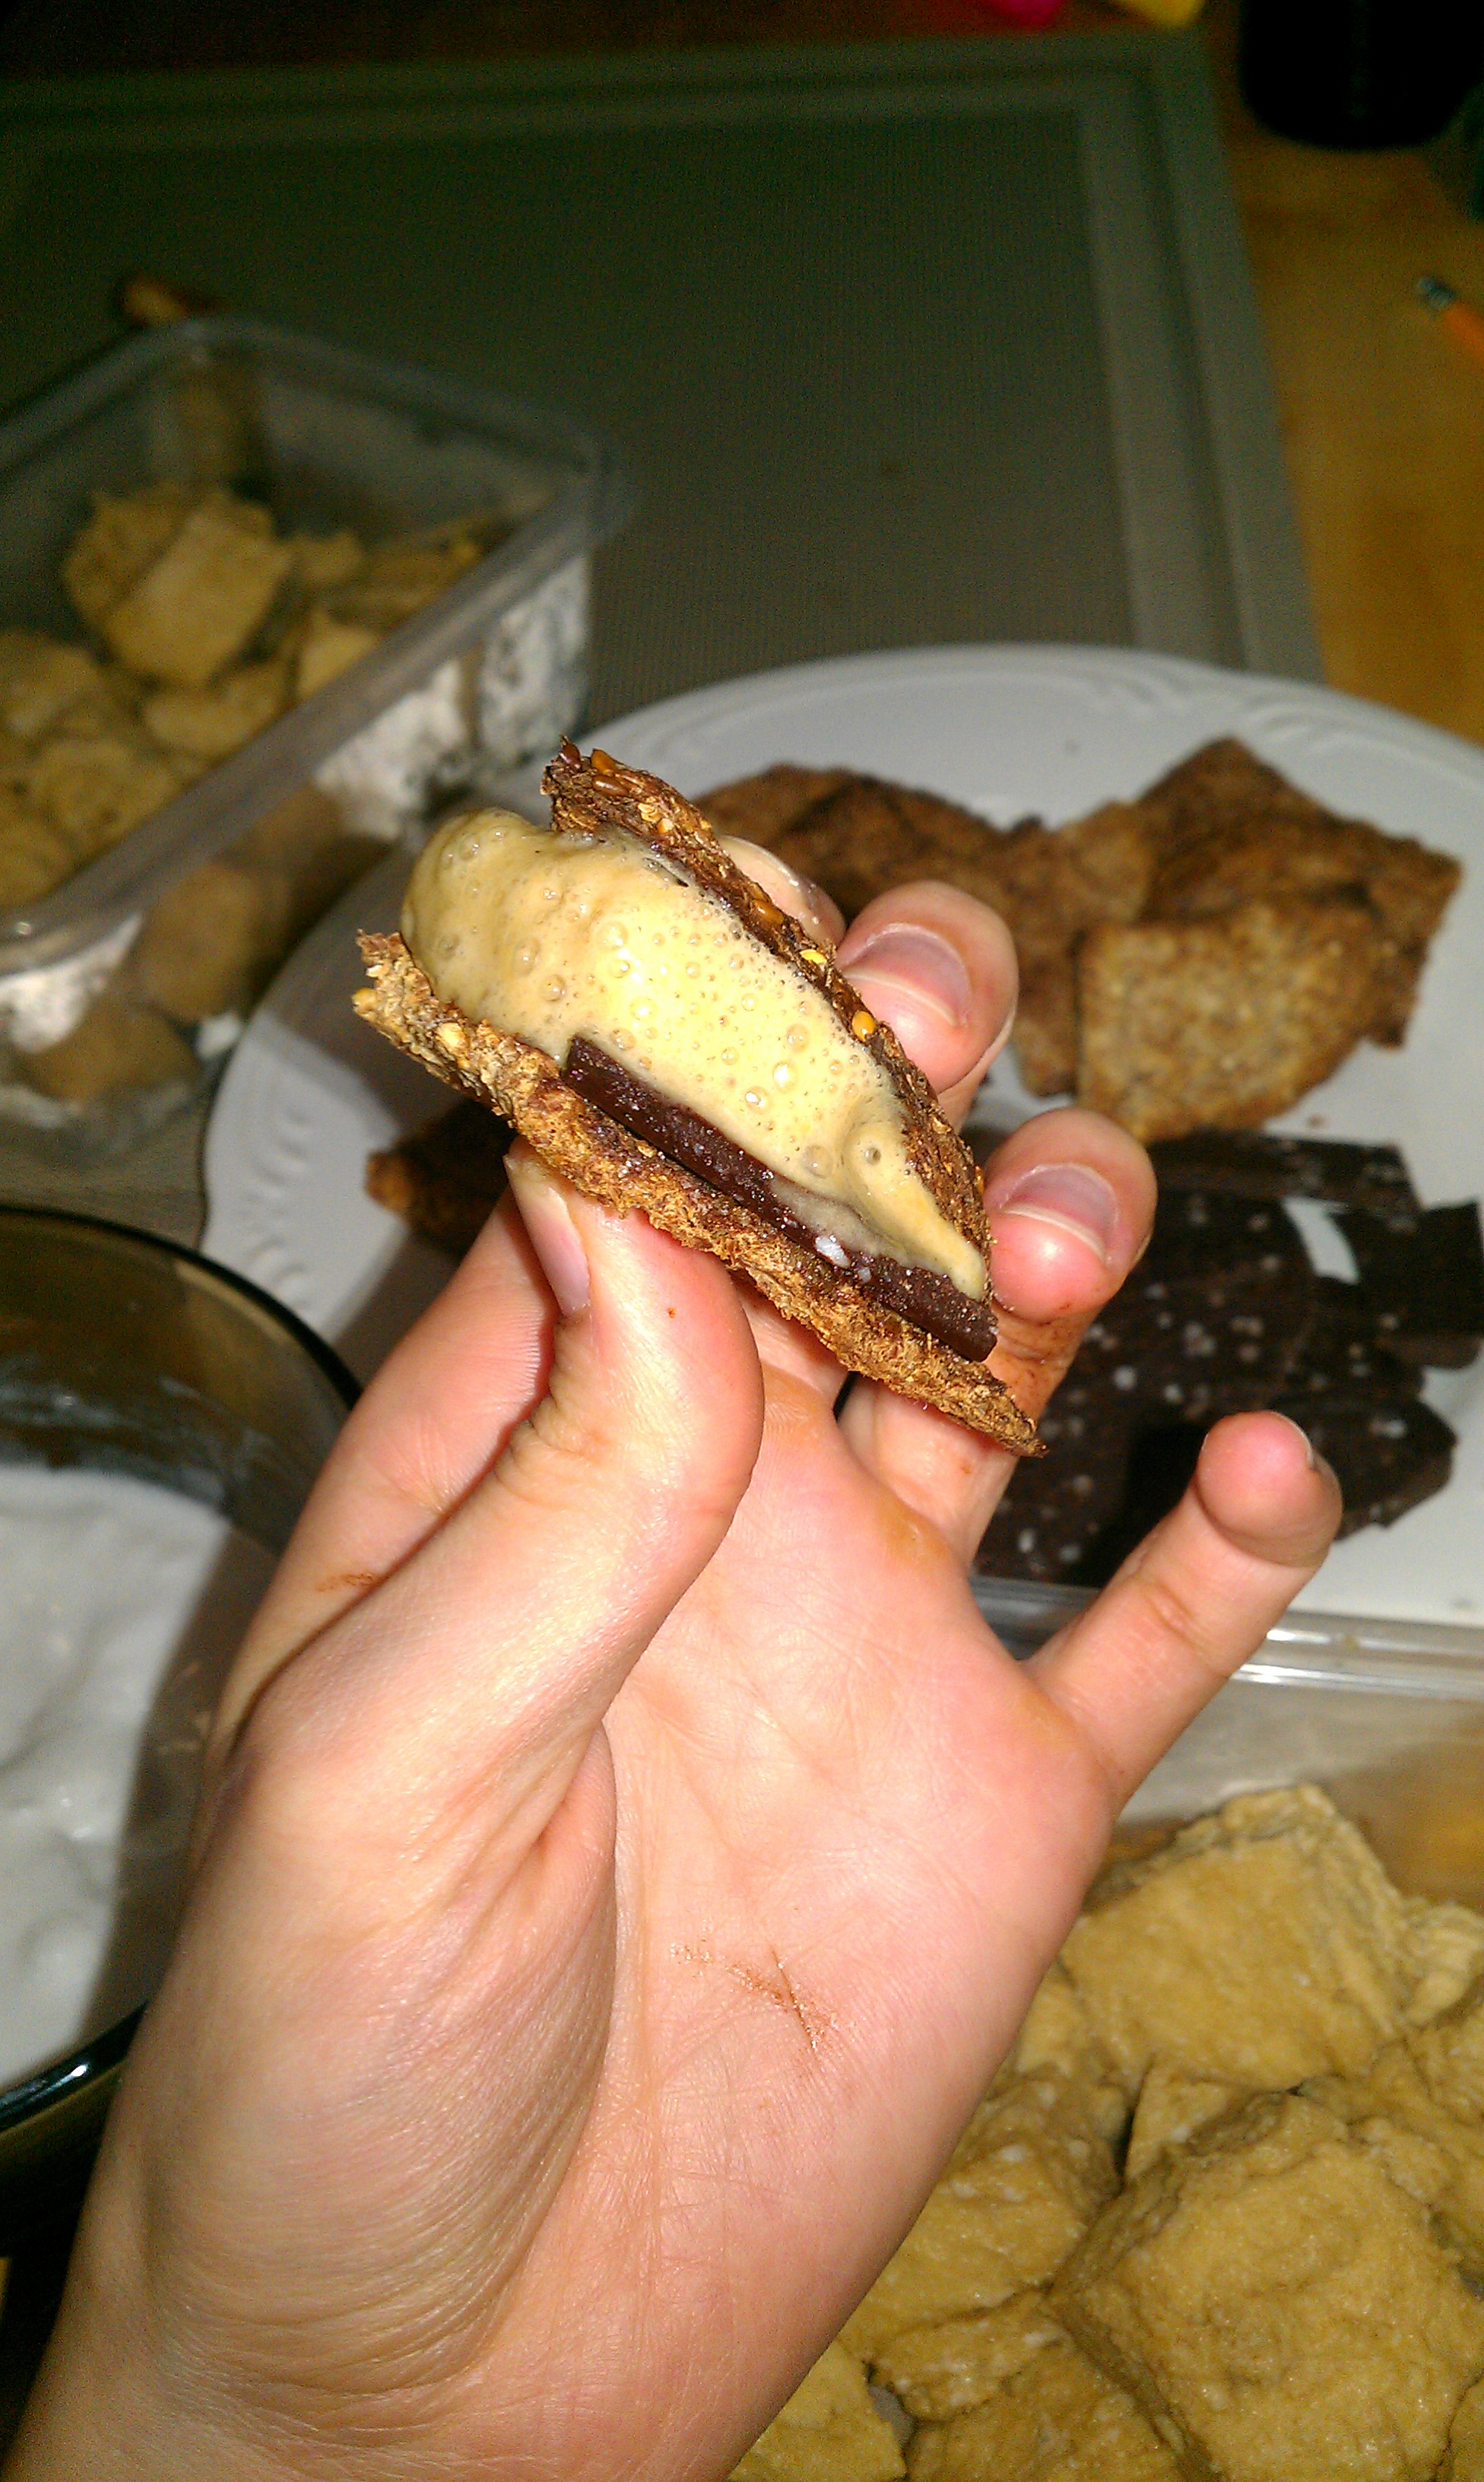
For those who ARE open to becoming more creative with protein powder, try mixing it into some organic Greek Yogurt, or mixing it into cooked and cooled down oatmeal, or even making it into a pudding like I mentioned and using it as a dip or sweet cream sauce like I did in this recipe.
Want to get really fancy?
Check out this video recipe for Protein Marshmallows!
Coming soon: Recipes for both my easy, homemade chocolate bars and simple, sprouted grain “graham” crackers to use with the Protein Marshmallows for the delicious S’mores-From-Scratch as shown here…
Like I said, the possibilities really are endless! :)
Whether you are new to fitness and starting off your fat-loss journey, or you are playing with a macro-based form of nutrition and dieting (like IIFYM, or If It Fits Your Macros); or you want to learn more about the “categories” your favorite foods fall into in terms of Protein, Fat, Carbs, or Fiber; or you want to practice a sustainable way of figuring out portion sizes that doesn’t require you to carry a scale or measuring cups around (because, honestly, who wants to do that?!)… I am excited to share this with you!
Here is a little “cheat sheet” that I made specially for my clients, which is now available to all of you in the store!
This affordable, simple-to-follow Cheat Sheet will help you learn:
Numerous common different sources of protein, carbohydrates, and fats
Which common whole foods are natural combinations of proteins/fats or protein/carbs
General suggested serving sizes for men and women (that don’t involve measuring cups!)
General food timing suggestions for optimal progress or fat loss
Additional tips about fiber, greasy/junk foods, and seasonings
It has proven to be a huge help to many of you guys already, which makes me super happy to hear because I put a lot of thought and time into it for you all! I definitely encourage you to order up (it’s a full-size .PDF download you will gain access to once purchased), print it out, and keep on the fridge!
Shoot, print out a few and keep one at work and one in your wallet or purse, too. Look it over as a guide whenever you need to, and feel free to share it with friends!
An even better idea (and how I provide these wonderful little things to clients in person) is to print your Cheat Sheet in half-page size and then laminate it at a local office supply store… this way you can circle or cross off foods with a dry erase marker, making it a compact re-usable grocery list!
Whether you are just starting out towards your fitness journey with nutritional awareness or well on your way and in need of a handy guide to keep things in check, I hope this acts as a useful tool for you or someone you know! :)
I’m going to keep this short and simple so you can try it, stat. Here is something so easy, SO yummy, and my clients have probably heard me mention it once or twice (hence the requests for this post, which I apologize for how long it took me to do)!
This individually-sized chocolate cake literally takes just a few minutes to make and uses simple, protein-packed ingredients that will satisfy your sweet tooth without artificial ingredients, sugars, or additives. The recipe is also gluten-free, dairy-free, and even vegan if you replace the liquid egg whites with a vegan-friendly egg substitute.
Easy Vegan Egg Substitute:Mix 2 Tbsp ground flax (seed or meal) with 6 Tbsp warm water. Let sit for about five minutes, until it becomes a gooey, egg-like consistency. Use in recipe as you would eggs/egg whites.
Plus, did you know that cocoa actually has numerous health benefits, including alleviating cravings and encouraging satiety? You’ll be surprised at how moist, rich, and delicious this turns out (and this is, admittedly, coming from someone who is NOT typically a fan of microwaving anything… never mind baked goods)!
Even more exciting news? This is just the first of a number of recipes (and videos) I will be posting featuring my most favorite, plant-based protein, RawFusion by SAN.
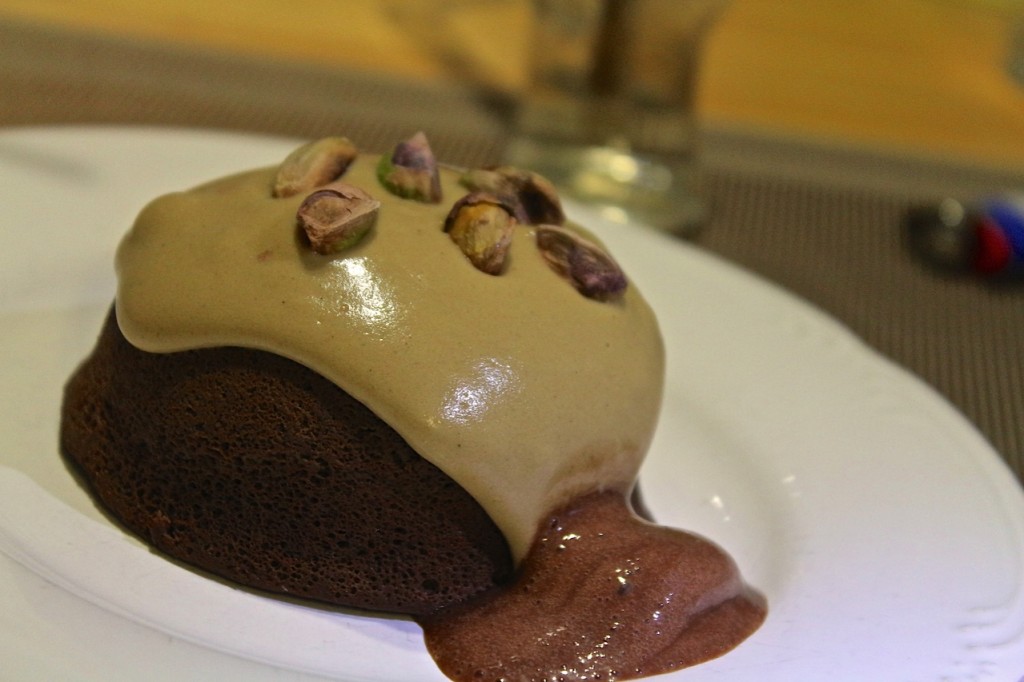
So here she is, the 3-Minute Chocolate Protein Cake (originally named the 2:30 AM Mudd Cake by the other half, who can also be credited for the lovely photo you see below… before it was devoured, of course).
3-Minute Chocolate Protein Cake (makes one serving)
In a mug or small bowl, whisk together the following:
1/4 – 1/2 C. liquid egg whites (enough to make it a batter consistency)
From there, simply put it in the microwave at a power level of 5 for 2 minutes (adjusting that power level is super important to ensure the right finished product here). Anddd… DONE!
(Could that have been any easier?!)
If you want to get even fancier, feel free to top it off with the following:
Sweet ‘n Creamy Vanilla Sauce (enough for two servings of cake)
Simply whisk together the following in a bowl:
1/2 Scoop of RawFusion protein (vanilla flavor preferred here!)
1/4 C. unsweetened Almond Milk (or enough to make it a thick-but-pourable consistency)
1 Tbsp Stevia
1/2 tsp. Pure Vanilla Extract
After the cakes are done, flip them over onto plates and then spoon that goodness on top. You can also sprinkle with some chopped nuts (like the pistachios seen above)! ENJOY :)
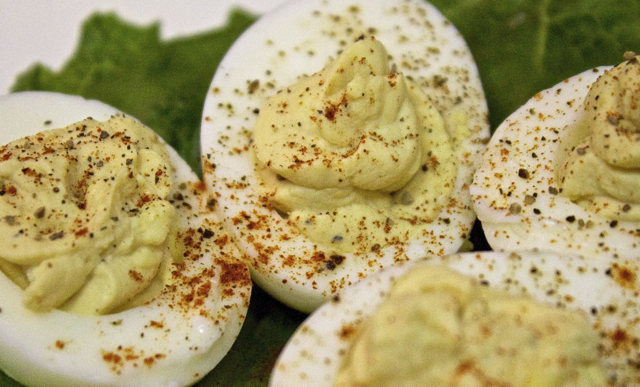
I absolutely LOVE eggs. Always have, always will. Whether they’re scrambled, sunny-side-up, chopped over a salad, or even straight out of the carton (whites, in that case. And no, it doesn’t taste like foot. It’s tasteless and awesome)… Eggs have always been a staple food in my regime of deliciousness.
Cadbury Creme Eggs were even my favorite holiday treat growing up, for goodness sake. Side note: Are you aware they have actually decreased 30% in size since back in the heyday? Truth.
I partly hold this on account of my dad and the memories of him making his yummy breakfasts of eggs, mushrooms, cumin, and close to a half-stick of butter in a pan. I always wanted whatever he was making because it smelled so warm and spicy. Plus, he always ate everything with Lebanese pita bread. Believe it or not, the pita and butter was my favorite part… I just kind of put up with the eggs (reminder: Nutrition Specialists are not born Nutrition Specialists) and I could still hear my mom saying, “That is TOO much butter for her! Way too much,” to which he would say okay and then slice me off another chunk of golden, melty goodness when she wasn’t looking.
Coincidentally, I really miss my dad about now… and the thought of that much butter at this point kind of makes my stomach turn. But, I digress.
When it comes to the most convenient form of eggs – hard boiled – there is actually a LOT more involved then throwing eggs in a boiling pot of water and then peeling them after a few minutes. It’s a SCIENCE, and if you don’t have it down, you’ll likely experience one (or all) of the following hard boiled fails:
Tearing and peeling half the whites off with the shell. I call this the Moon Crater fail.
Success with peeling… but a puke green rim (or totally green, for that matter) yolk on the inside. Aka: the Groke.
A yolk that isn’t completely cooked and still runny (which is on purpose, at times, ie. the soft boiled egg).
A cracked or broken shell while boiling which ends up in seeping out whites and tumor-growth looking eggs.
(Add your hard boiled egg fail here)
It came to my attention recently that so many people don’t know exactly how to make the perfect hard boiled egg. Whenever anyone asks me what a good, portable, convenient option is for a snack, one of my go-to suggestions is this winner. However, 9 out of 10 people say they can never make them right! As soon as a couple of clients mentioned spending way too much money on a way questionable means of this amazing, protein-packed snack (*cough* 7-11 ready hard boiled eggs in a plastic baggy), I KNEW I had to share this post to benefit their bellies and everyone else who fears attempting the delicousness that is the HBE.
I’m pretty happy to say I have it down to a science and am even happier to share it here!
HOW TO MAKE THE PERFECT HARD BOILED EGGS
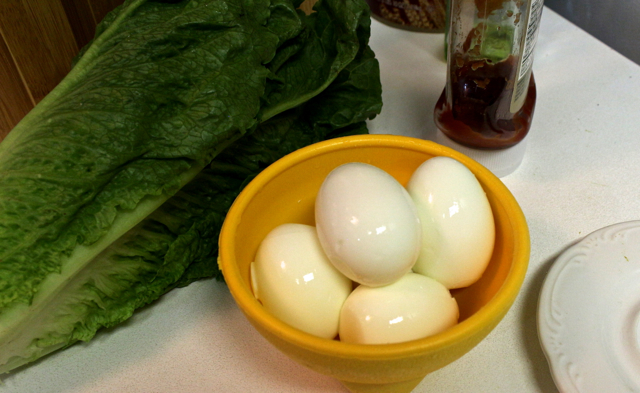
You’ll need:
Eggs
Water
Large sauce pan with lid
Large slotted spoon
Large bowl
Ice
As an example here, I’m using a small saucepan and just a few eggs. But I highly suggest making these in bulk and using the biggest stock or sauce pan you have because you want to make sure the eggs are covered by a good inch of water without it boiling over once things get moving. Plus, it’s amazingly convenient to have a bunch of them ready to go in the fridge, especially if you don’t have time to prepare food during the day and need a quick snack (or protein for a full) to grab and go.
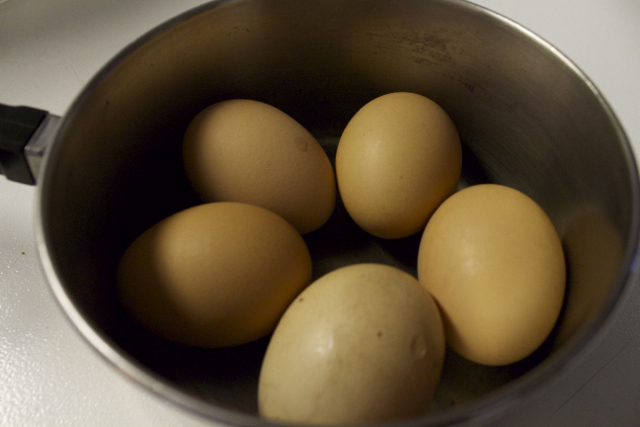
Step 1: Carefully place cold eggs in a single layer at the bottom of your sauce pan.
Notice the bottom egg is a little cracked. At the end, I share a tip that helps salvage the whites if they seep out while boiling.
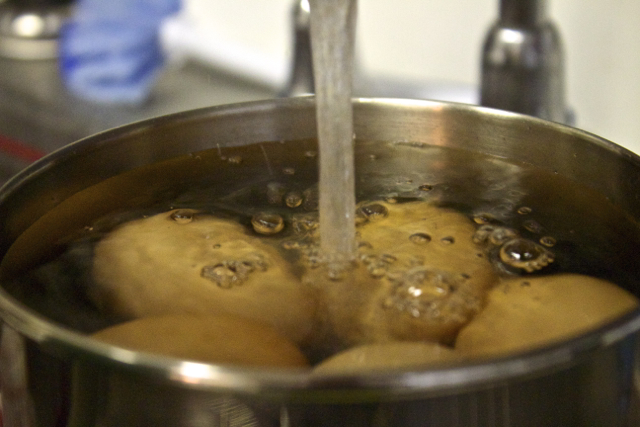
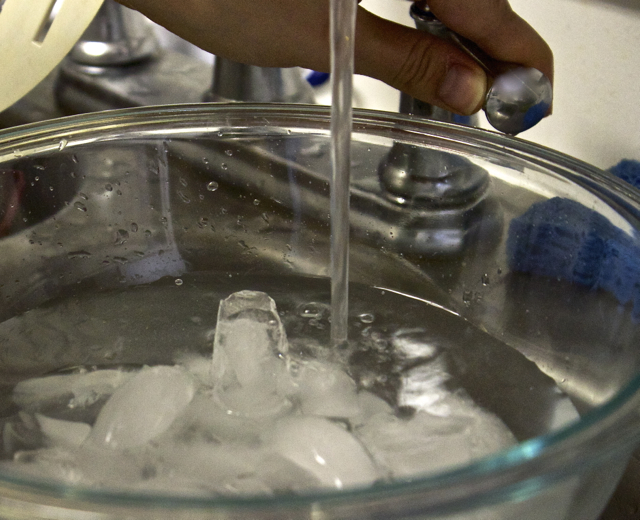
Step 2: Fill the sauce pan with cold water until all the eggs are completely submerged (about an inch of water above eggs).
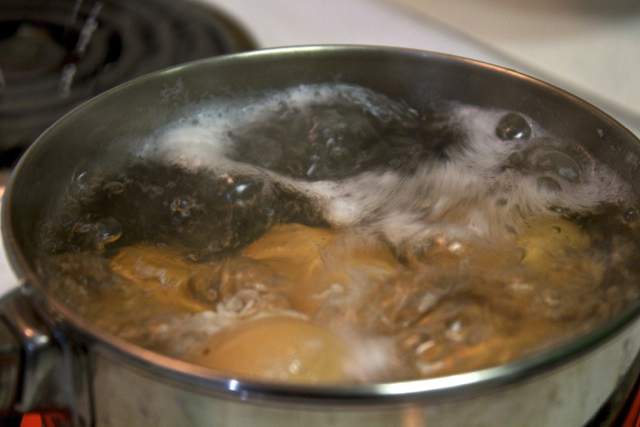
Step 3: Put sauce pan on stove and set it to high to boil.
Keep a good eye on it because it won’t need to boil for long…
Step 4: Once water gets going with a rolling boil, let boil for only one minute before removing from stove top.
Step 5: Cover with lid and take off the burner, setting it to the side
Set a timer for 15 minutes. The eggs will continue cooking in the hot water as they sit.
Step 6: Fill up a large bowl halfway with ice and then up about 3/4 high with cold water
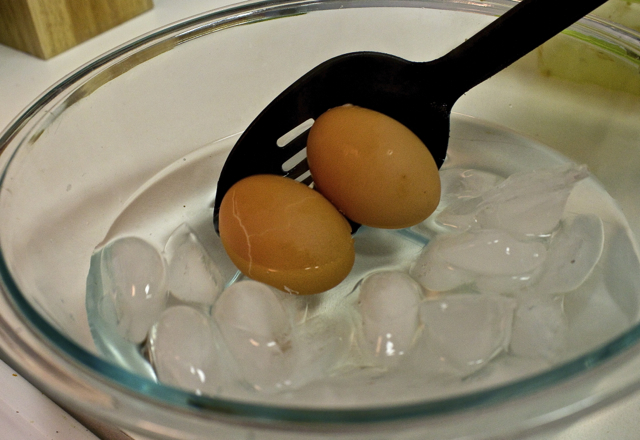
Step 7: Once timer goes off, use a slotted spoon to remove eggs from sauce pan and place in ice bowl.
Let sit about 10 minutes, until ice is mostly melted down.
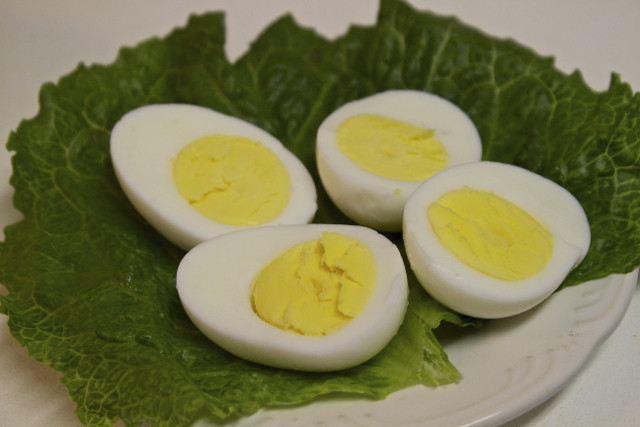
Can you guess which egg is the one that had the crack in it?
Now. Time for things to get serious.
You’ve made it this far, peeling glory is soon ahead.
And what would an instructional post be without a little video for the visual people?
Main tricks are:
Have water handy for rinsing (and even peeling under). It will help the shell slip off.
Tap both ends of the egg gently on a counter, then do a gentle “rolling’ motion to break it all around before peeling off (this REALLY helps!)
Use the side of your thumb to gently glide the shell off (as opposed to nails or the tips of your fingers). This alleviates risk of tearing any whites off with the shell.
Organic, brown eggs are harder to peel than regular, white eggs. Basically, the fresher the egg, the harder to peel. I definitely suggest and prefer organic, free range eggs if you plan on eating the whole thing including the yolk-y goodness. But if you mainly just want the whites, it will be easier on your prep (and wallet) to just get regular white eggs.
Try not to eat them as you’re peeling. At least not all of them. Yummy little health balls they are.
Additionally, if for some reason an egg cracks in the pot and whites start seeping out (like one of mine did because it had a slight crack in the shell before putting in), have some distilled white vinegar handy and throw a splash or two in the water as it begins to heat up. This helps the white coagulate faster and works well to salvage the egg.
Food for thought: Do you feel like hard boiled eggs make you bloated and gassy?
There is actually justification for this. Eggs (particularly the whites) are very high in sulfur… what most people familiarize with the “rotten egg” or Florida sprinkler system smell. Sulfur is a beneficial nutrient and one of the reasons eggs are a great super food. Any time eggs are cooked, the sulfuric compounds in the proteins are broken down and hydrogen sulfide is released (the cause of that smell). In the case of the HBE, however, this hydrogen sulfide has nowhere to really go. The green rim around the yolk from “overcooking” is actually a reaction between the ferrous iron in the yolk and the hydrogen sulfide in the white (yay, science)!
Some people poke a tiny hole with a very small needle in the shell of the egg before boiling to release pressure and claim this eases any digestive upset caused by the broken down proteins.I’ve never noticed any digestive issues regarding HBE’s personally, but it may be worth trying if you’ve had this issue! People also claim that poking the tiny hole encourages more even cooking, making the eggs easier to peel. But, as you can see once you try my method, a hole isn’t necessary for super hard boiled success!
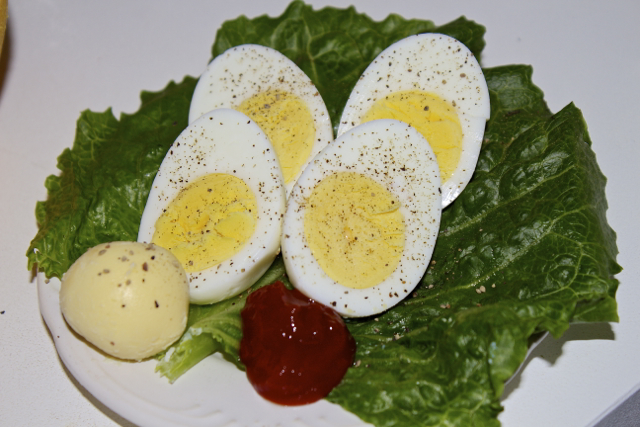
Now time to go enjoy them however you like! My preference is simple with a bit of sweet and tangy homemade ketchup :)
Now that you know how to cook them up, what is your favorite way to eat hard boiled eggs?
This Healthy Recipe of the Month is probably my favorite go-to salad. It’s just perfect to fulfill a craving… it’s filling but still refreshing as a salad should be. I’m a huge texture person and my perfect meal usually has a mix of different bites; crunchy, soft, crispy, creamy, salty, and sweet. This salad definitely has all of that rolled into one. Not only that, but as you can see, it is ridiculously easy to put together AND can be served as a main dish or side salad to accompany a meal.
Hope you enjoy it as much as I do!
Nom nom nom ………
As I’ve mentioned in previous posts, this is an easily printable format that I provide for health clubs like Anytime Fitness in Ormond Beach and Anytime Fitness in Winter Park, both in Florida. If you would like to receive a Healthy Recipe of the Month for your fitness club or gym, please don’t hesitate to contact me and I will be happy to add you to the list! :)
Question of the week: What is the BEST salad, homemade or restaurant, that you’ve ever had?
… or for however many you like, really. This impromptu what-do-I-have-in-the-pantry-that-I-can-make-dessert-ish recipe is VERY easy and came out to two super moist and tasty little cakes. The consistency is almost fudge-like; the outside is just crisp enough to make it sort of a less gooey chocolate lava cake.
Yes it is as decadently good as it looks…..
And added bonus, they are egg-free, gluten-free, paleo-friendly (depending how strict of a regimen you’re on considering there is a pseudo-grain flour involved), and it can easily be vegan/dairy-free by simply substituting the kind of protein used in the sweet cream sauce to something like Sunwarrior Protein-Vanilla. Make sure to check out the notes below the recipe for more tips! :)
Try it out and let me know what you think!
Quinoa Cocoa Cakes for Two
Ingredients:
1/4 Cup Quinoa Flour
2 Tbsp cocoa powder
3 Tbsp Stevia*
1/4 tsp. Baking Powder
Pinch of salt
Scant 1/4 tsp instant coffee or espresso (optional)
1 Tbsp Ground Flaxmeal
1 Tbsp Extra Virgin Olive Oil*
1/4 Cup + 3 Tbsp water
1/4 tsp. Vanilla Extract
What to do:
Preheat oven to 350.*
In a small glass or bowl, whisk together flaxmeal, olive oil, water, and vanilla extract. Let sit for 5 minutes.
In another bowl, mix together quinoa flour, cocoa powder, stevia, baking powder, instant coffee, and salt.
Add flax liquid to dry ingredients and whisk together well.
Split batter into two greased large muffin tins (or I had mini-bundt tins). Bake for 20-25 minutes, until toothpick inserted comes out clean.
Plate each on top of half the Sweet Cream Sauce. Optional tops include.. well.. basically whatever you want. I had a dollop of Son of a Butter! Smoky Bacon Peanut Butter and a fresh strawberry.
*Next time I may try baking at 375 for around 18 minutes. If you like a more cakey, less fudgy center, this option would encourage that more.
Crazy Easy Sweet Cream Protein Sauce:
Scoop 1-2 Servings of your favorite vanilla protein powder into a bowl (I used Vi-Shape by Body By Vi since that is all I had on hand) and whisk with just enough water for thick sauce consistency. I added a touch of cardamom and cinnamon for an extra yumminess.
P.S. Don’t forget, if you want photos of recipes as they are created, workout tips, free gym routines, and other random goodness, you can follow me on Instagram or Twitter too. Happy New Year, everyone!
They’re everywhere. Moaning and limping and dragging their undead-selves all around the movies, television, and any other media outlet. Zombies are officially the IT thing lately, trendier than- dare I say it- yoga or going raw. They are the automatic celebrity and don’t even have to bathe, have all their limbs, communicate legibly, or smell particularly fresh.
But, let’s face it, they could use some help in the health and body departments just as much as any other person. They were living people like us at one point, after all. That’s why I took the time to give any future zombies what they deserve: Nutritional guidelines before the Zombie Apocalypse actually hits.
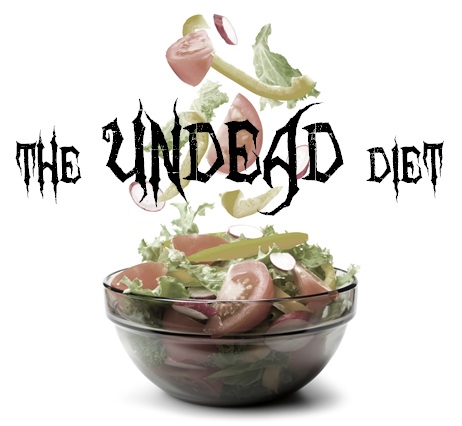
This is a list of the best foods for zombies (before becoming zombies), aka, The Undead Diet:
Aloe Vera Juice: I don’t know if I’ve ever seen a zombie without gruesome cuts, wounds, or missing limbs. Although green juice is the last thing one would be caught consuming, we can make sure to prepare our body for ultimate healing beforehand by drinking at least a quarter cup of Aloe Vera Juice every day. Not only does it encourage digestion and restoration, it has also been shown to help those with anemia by stimulating bone marrow to create blood cells. Win-win for the walking dead!
Hot Chili Peppers: If there is one area where zombies obviously need help, it’s their skin. Wrinkly, dry, chapped, half fallen off; it’s just never at its best. Hot Chili Peppers offer the most Vitamin C per gram, and Vitamin C is the prime precursor for collagen production which keeps our skin supple, plump, and youthful. Additionally, the capsaicin (element that makes them hot) has been shown to slow and reduce cancerous growth, increase circulation, and increase endorphins to elevate your mood. In a nutshell, chili-pepper-it-up now if you want to be a happy zombie with envious skin!
Blueberries: Not only are blueberries full of E, A, C, and B-complex vitamins; but also copper, which acts as an anti-bacterial, and iron, which promotes immunity by raising hemoglobin and oxygen concentration in the blood. Not to mention, the anthocyanins (what makes blueberries blue) provide endless anti-oxidant benefits; from acting as an anti-inflammatory, to protecting the nervous system, to encouraging collagen production and improving eyesight. Take advantage of these tasty little nuggets while they are still on your menu!
Organic Grass-fed Beef: Now, this is a huge staple in The Undead Diet, and it’s important to make sure you get organic and grass-fed. It has the recommended 3:1 ratio of omega 6 to omega 3 fats, which provide endless benefits from internal lubrication to anti-inflammation. It is also up to four times higher in Vitamin E than commercially-raised beef. But the biggest advantages before starting your zombie afterlife come from the abundant iron and protein (particularly, lysine). Lysine plays a huge role in the formation of collagen, which is important for healthy connective tissues and bones. Organic, grass-fed beef is a prime preventative measure to keep your limbs as strong (and attached) as possible!
Carrot Juice: Zombies aren’t huge fans of the sun. Even when they do get some rays, their complexion stays as gray as a gargoyle. Not only does just one cup of carrots provide more than 400% of your daily value for vitamin A, but the beta-carotene also brightens up the skin with a healthy glow if you incorporate it into your diet regularly. By drinking carrot juice, the bioavailability of the beta-carotene is drastically increased and better absorbed in your body. So drink it up and give your pre-undead self some nice color to carry over!
Wild-Caught Salmon: Speaking of skin, salmon is one of the best sources of Omega-3 Fatty Acids, or EFAs, which has been shown to reduce UV-induced damage and wrinkles. Seeing as you’ll be spending most of your days shuffling about aimlessly in the sun, this is a definite necessity. Salmon is also one of the highest foods in zinc, which helps aid against sickness and decay. Basically, the copious benefits of salmon make it a true zombie super food.
Organic Yogurt: You won’t exactly be eating enough greens or drinking enough milk in your walking dead days to keep those bones and teeth strong. Six ounces of this fermented goodness provides over 20% of your daily value in calcium to do just that. Plus, the probiotics will keep your gut flora in check boost cellular immunity. Even better: The yogurt’s live cultures have been shown to lessen tongue-bacteria and sulfide compounds responsible for bad breath… and I think we all know zombies need as much help as possible when it comes to that.
Ginger: Stiff joints seem to come with the territory when crossing over to the other side, and one of the most versatile and delicious ways to alleviate such rigid discomfort is with spicy ginger. The gastrointestinal benefits of this pungently delicious spice are popular with teas and juicing, but did you know that ginger is also a potent anti-inflammatory that can be used to alleviate arthritic aches and pains? Mince it, grate it, boil it- simply enjoy it! Who’s to say you won’t shuffle a little more gracefully?
Liquid Chlorophyll: Although I’ve never been within close enough distance to know firsthand, word on the street is that zombies smell like, well, death. In comes Liquid Chlorophyll, a detoxifying supplement that acts as a natural deodorizer to the body. It is also a great source of magnesium and cleans your digestive tract of pesticides and toxins. While all the other walking dead mosey around wafting the scent of rotting flesh, this will keep you as fresh and clean as possible from the inside out.
There you have it, The Undead Diet. Brace yourself for the Zombie Apocalypse by adding these nutritious, functional choices into your regime and you’ll be one of the most well put-together Walkers around!
(Hey, even if the movies are just pulling everyone’s chain and it never happens, at least you can still enjoy the benefits of these foods just the same.)
I am so backed up on posting recipes on here that I will probably spend the next couple of weeks putting a new one up every other day! Okay, maybe not that much to bombard your updates… but at least a handful more before the year is over to play catch up a bit. :)
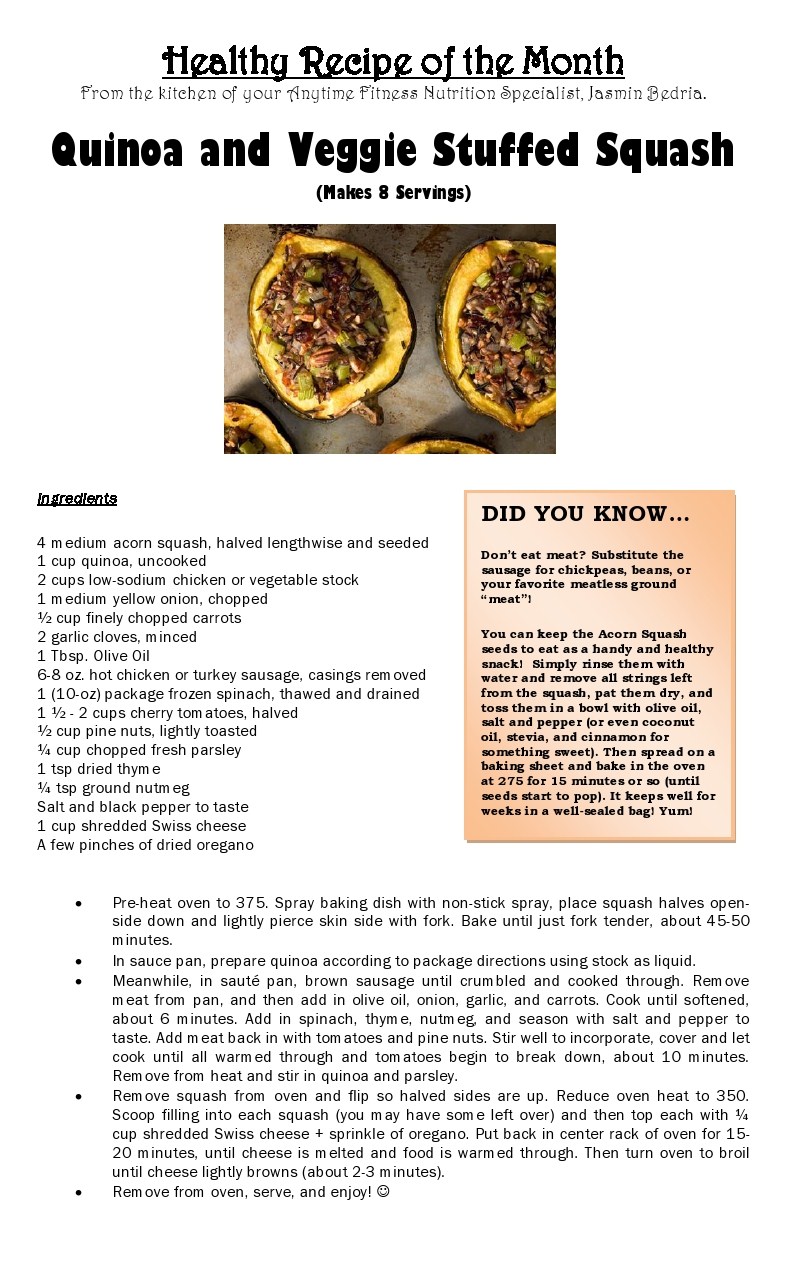
This one also got some awesome reviews from the members of Anytime Fitness. It’s super easy and SUPER yummy, and you can play around with ingredients (adding more veggies you like, including meat/cheese or not, all kinds of fun deliciousness) according to your personal specifications. Make sure to comment below with any fun alterations you try!
I kept this the same format as the last instead of typing it out on here, and will continue doing so due to the feedback about it being easy to print and share. Yay for my computer skills making you happy! :)
Mmm.. I love squash season…
Some more recipes you have to look forward to (just off the top of my head, because there will be a LOT more) are: Oven-Roasted Veggies; Cinna-Beer Buns with Honey Beer Caramel & Chopped Pretzel Filling (the original, unhealthy version… consider it a Splurge-cipe!); my Go-To Dinner Salad (trust me, it’s absolutely mouth-watering); and tons of others I’ve gotten requests for.
If you want to be a little ahead of the game when it comes to food photos, recipes, fitness tips, free workouts, or other randomly entertaining things, add me on Instagram and Twitter.
Also don’t forget to like us on Facebook or subscribe for email updates to the left if you’d like to know whenever a new blog is posted! I am also planning some reaaally awesome give-aways for the beginning of the new year for Facebook friends so clickity click if you want to see what’s in store.
And, one last thing: Please, please, PLEASE share our Veteran’s Corner page with any and all military veterans you know! It is bound to be a GREAT venue for them, whether they are experienced writers or not, and we are very excited about making this something special! I have also decided to include veteran’s spouses, family members, or significant others as possible contributors. If this describes you, please go check out the submission page and I look forward to hearing from you soon!
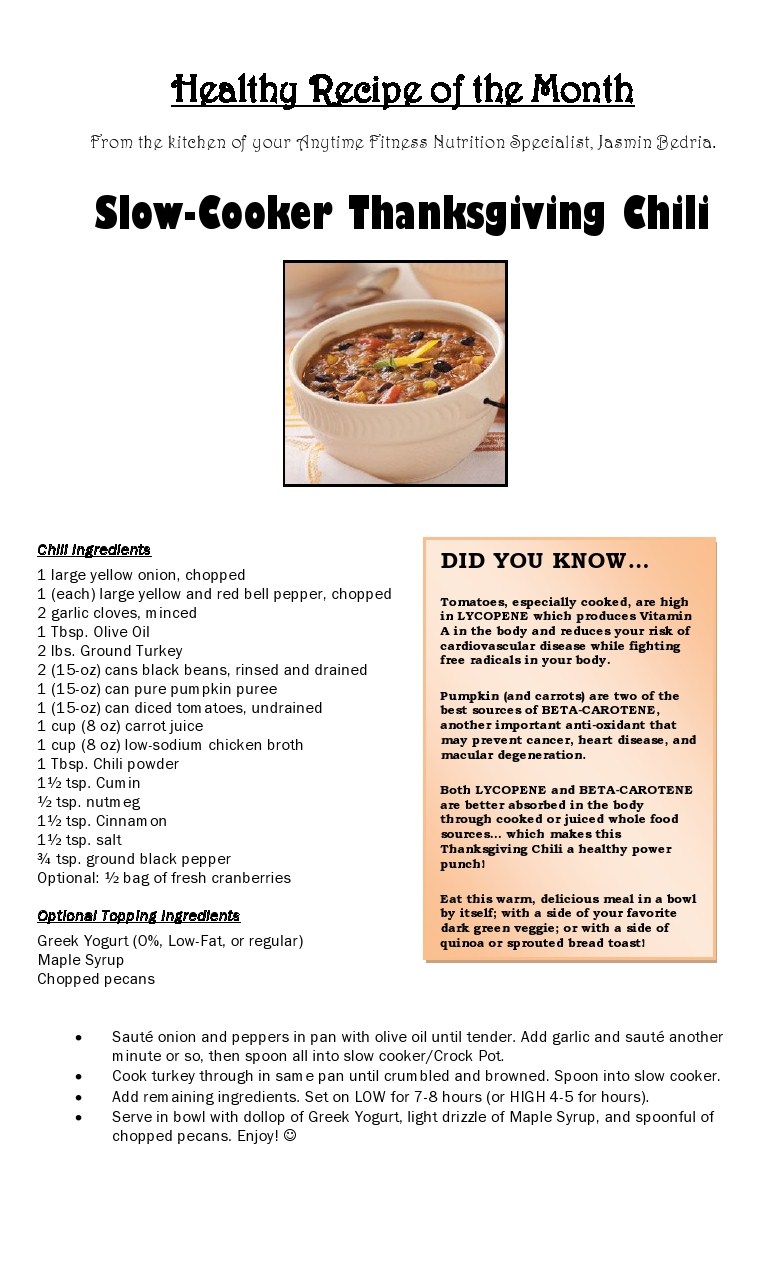
I know we are already well-beyond our tryptophan comas, but I still had to share this delicious and EASY recipe with everyone since it got such rave reviews from the members at the Anytime Fitness where I train and lend a helping hand.
Rather than re-typing it out on here, I attached it in the same handout format that I originally made. This way, you can just click on and print to size (either in a new window, or right click and hit “print”). Easy, breezy.
Try it out and let me know what you think in the comments below! And, of course, Happy-Deliciously-Belated-Thanksgiving!
Super easy, super delicious, super festive ANY time of year!